Showing posts with label feathers. Show all posts

Wednesday, 21 June 2017

WOYWW #420: Heatwave!!!

I'm taking part in WOYWW three times in a row this month! And let me tell you, it is HOT in the UK right now - well, by British standards, anyway. I took this photo of my temporary desk in the garden on Monday working on a LifeBook lesson, but after that I had to move indoors as it was unbearably hot out there, even in the shade. If you want to see the finished project, you can find it here.


Other than that, I have a couple of pages in my new organizer to show you. They look very similar as I used the same paints and imagery, but they are supposed to be separate pages. The left hand side is the inside cover of my organizer. 


I took this photo while we were on a family outing in Evesham, Worcestershire. There's a possibility we might move there, so we looked around the town. This is the local museum and dates back to the 14th century!  


Could anyone identify this feather for me? I found it on my walk around the countryside. I'm hoping it's an owl feather, or something equally cool, like a hawk or a falcon. It would be good to know! It has the patterns of a tawny owl feather, but it's more pointed than the ones I saw online. 


Here's Oreo keeping cool on the roof over the garage last night. Now that we have to keep all windows open, he can get out there. He likes to observe the other cats from a safe vantage point. 


Happy Summer Solstice - enjoy the longest day of the year! 

Wednesday, 14 June 2017

WOYWW #419: A cheap organizer

Hello peeps! I'm here again for another round of WOYWW - the second week in a row, which is an achievement in itself. I managed to do some arting yesterday - here's the obligatory desk shot:


I was working (playing!) in a cheap organizer I'd picked up from The Works at the weekend for just £2! It's got lots of pockets, which is what attracted me to it in the first place. I'm not an organizer sort of person, so I'll just use it as an art journal and fill the pockets with tags and cards and such. I've already done a couple of pages, just randomly playing with paint. Not all pages need to have a "story" - sometimes it's just about the play. I'll have fun altering the cover later. It's nice and sturdy, so I'm thinking of a Finnabair-type collage for the cover. 

The £2 organizer!

First two pages

Detail shot
Detail shot
I've also found a great way to display my printed feathers from last week. Remember those mini buckets I altered a while ago? They're perfect for holding my feathers! I just stuck a bit of aluminium foil in them to hold the feathers in place - almost like a bunch of flowers. I need to paint some more feathers so I can fill all three of my buckets.


We've had some lovely sunny weather over the last few days. I just hope it won't get too hot. Any hotter and I start suffering. Here's Oreo enjoying a bit of sunbathing, making sure the rays reach all parts of his tummy, not worrying about his modesty. How does he not get overheated with all that fur?


Thanks for popping in!
Hope your day is filled with sunshine too! 

Wednesday, 7 June 2017

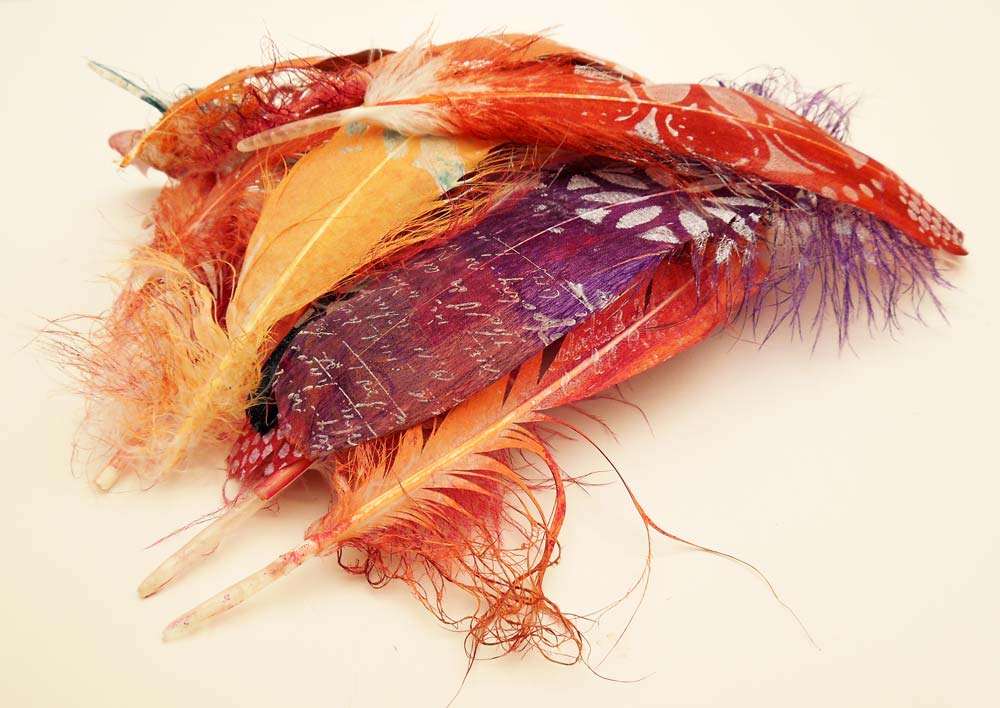
WOYWW #418: Gelli printed feathers

Has it really been 4 weeks since my last post? I'm checking in with a quick project and update for WOYWW.  We have finally sold our house, just before pulling it off the market. The problem is that we still haven't found anywhere to buy, so it might all fall apart, but we'll keep looking. The good news is, that I can bring my stuff out now and start creating again - as I don't need to keep the house pristine clean and tidy, ready for viewings. So I wasted no time to get messy and got my gelli plate out yesterday to print on some feathers. I was inspired by this video on YT. This is what my desk looked like during the proceedings:


You can spot a stack of white feathers that I got on eBay. They came from China and were very cheap. I used my 8X8 inch gelli plate with a variety of acrylic paints to colour the feathers and then I stamped and stencilled on top of them with white paint. This is what I ended up with:


I've also got some nice prints from the gelli plate:


The feathers are very pretty to look at. I might used them in projects, or just put them in a jar for decoration. This was just a quick project to jumpstart my creativity. It's hard to get back on the bandwagon once you've fallen off, but I intend to return at full steam- sometime soon!

We went on a short mini-holiday last week during the half term break. I'll post some photos - see if you can tell where we were. Hint: I expect Angela (@Felix the Crafty Cat) will recognize this place immediately. 


We were away only for one night and decided to leave Oreo in the house instead of putting him in a cattery. I'm sure he preferred it this way too. We left him with plenty of food/water and he had the view of the garden, all his toys and several places to sleep to while away the hours. He was fine when we returned and he didn't seem to have missed us at all.  


I've missed this years ATC swap, but I'm looking forward to seeing 
all your wonderful creations as I do my rounds. 
Happy W8YWW! 

Friday, 13 January 2017

LifeBook Week02 (Part 2): Song of the Hummingbird

This is the second bonus lesson of this week's LifeBook offerings, by Tamara herself. We've certainly been kept busy so far this year and I'm just glad to be able to keep up with all this amazing inspiration!

Tam's hummingbird lesson involved collaged feathers cut from patterned paper, each representing a positive affirmation. The biggest challenge for me was the choosing of the papers. I auditioned several sheets and even cut shapes out of each, only to settle on this simple two-way design. I decided less was more in this case.

Drawing the hummingbird was quite simple, but I still managed to mess up - this is my second version. Yes, it still happens, but I'm quite happy with it now. I like its colour harmony and simplicity. I added a few drops of stickles too to make it a bit sparkly and special. Again, with glitter, less is always more!


Wishing you a lucky Friday the 13th!

Friday, 11 September 2015

Stamped Feather: Breathe

Today I'd like to share with you a very simple project, inspired by Rachael Rice, who was also responsible for the Dreamcatcher lesson in LifeBook 2015. As you can tell, she likes working with feathers. I first saw this tutorial through the Willowing website - you can check it out here. All you need is a large feather and some basic craft supplies..

I often go to my local Deer Park for a walk in the mornings whenever I can. Usually, there's nobody there at that time of day and I enjoy the solitude and peace & quiet, alone with my own thoughts. If you're an introvert like me, you'll understand the need to be alone from time to time, in order to listen to your inner voice and fill up with energy. As I was walking on the dewy grass on a sunny morning a few day ago, I literally bumped into this large black feather (about 8" in length) and remembered the tutorial. It felt like it had been put there for me right in my path, so of course, I had to pick it up!

The Deer Park

The Feather
I didn't have to think long about the word I wanted to put on my feather. I instantly knew it was going to be "breathe" to remind myself to relax and let go of my anxieties. These past few months have been pretty stressful for me, which resulted in quite severe anxiety attacks. I read somewhere that if you allow yourself to breathe in deep and exhale slowly, it relaxes your body and helps you overcome anxiety attacks. I'm happy to say it really works! Now when I feel an attack coming, I just breathe through it. This is what I did with my feather, following the instructions in the tutorial:


Tip: before using the feather, I disinfected it with some pure alcohol. I will hang it above my computer desk as a reminder to keep calm. Happy crafting peeps!

Tuesday, 27 January 2015

LifeBook Week05: Dreamcatcher

This week's LifeBook lesson taught by Rachael Rice is all about dreamcatchers! I'd never heard of dreamcatchers before and I was fascinated by Rachael's introduction into this Native American tradition. If you're wondering what dreamcatchers are just check out these images on Google.

We didn't make a physical dreamcatcher, we created a representation of one for our art journal using a doily and some pretend feathers cut from paper. The words and symbols on our dreamcatcher represent our intentions for the year. For me this is progress, positive change, moving in the right direction and trusting the journey.

I used gelli prints for my background, as well as some music paper, number stamping and white and copper acrylic paints to distress it. Instead of a real doily I chose a paper one and altered it with copper paint and gilding wax.

I used a purple Gelato (grape) to shade around the edges of my page as well as under and around the doily to make it stand out more. I used the same Gelato for colouring the paper shapes and blended it with Gesso. This made it possible for me to write over the Gelato layer with a white pen. I edged the feather shapes with copper gilding wax to give them dimension.

The dots for the chain to "hang" the feathers were done with copper Stickles. Finally, I added some real feathers and trims to the layout to make it truly mixed media.

I really enjoyed working on this lesson. You can see some photos of my process below, as well as some close ups of the finished project. (Click on the first image to open the gallery.)

Gelli print collage with white and copper brayering

Music papers, stamping and additional brayering
The completed page