Showing posts with label Let's Play. Show all posts

Friday, 1 June 2018

Playing with Acrylic Skins

I came across Carolyn Dube's ground-breaking video the other day and the proverbial light bulb went off in my creative mind! Carolyn used her left-over poured paints on the gelli plate to create some really cool acrylic skins. I didn't have any left over paint to use up but I did have a bottle of Liquitex pouring medium that I bought years ago and never used.

You can try this technique, even if you don't have a gelli plate. All you need is a non-stick surface like a silicone mat, so you can peel off the skins when they're dry. Even a piece of acetate might be suitable, but I do recommend a silicone mat.

This is what my work surface looked like during the experiments:


Firts, I made some random puddles with the pouring medium mixed with a few drops of  acrylic ink. I dunked the mini gelli plates into the mixture - very much like Carolyn did with her left-over paint and let them dry. There was still plenty of inky medium left on my mat, which I then left to dry as well. If you notice any thin areas on your plates or in your puddles (Carolyn called these "bold spots" LOL!") you can always add a few drops of pouring medium to patch them up. The white areas in my photo show where I added more medium - this is also good for thinning the inks and making the skins more transparent. You can also see some leaves on my mat. These are skeleton leaves, which I dipped in the inky pouring mixture and simply let dry on my mat. It took overnight for everything  to dry completely.

I was so excited, it's a miracle I was able to sleep at all! The next day, I was able to peel my acrylic skins off the gelli plates and the silicone mat quite easily. I was also very happy to see how well the leaves turned out.


You can use the acrylic skins as window clings or you can do all sorts of other fun stuff with them, like die-cutting! If you place the acrylic skins between two sheets of wax paper, you should be able to die-cut them. This may not work if your skins are too thick for your dies, but I was able to cut mine with the Sizzix Thinlits. Here are some of the shapes I cut from my skins:


I used these shapes to decorate some tags and journalling cards I'd created earlier. I used the same inks for the skins, so they co-ordinate perfectly. This wasn't intentional, but those inks just happened to be still sitting on my desk when I tried this experiment! A lucky coincidence! Here are the finished elements, which will be part of a larger project to be unveiled later!


I used found words cut from a book on these tags and cards, which is a favourite technique of mine when I'm lost for words. Here's a closer look at some of them. 


Huge thanks to Carolyn for the inspiration!
Happy experimenting!

Thursday, 17 March 2016

My completed Play Journal

I've been regularly sharing pages from my Play journal and now that it is complete, I decided to do a round-up of all the pages in a video slideshow.

My journal started its life as a regular, cheap notebook with thin, ruled pages. I removed some of the pages and stuck every second of the remaining pages together with gel medium. I think it worked extremely well, proving that you don't need an expensive, branded journal for doing something like this. It even has my favourite rounded corners and an elastic band for closure! 

I first introduced this journal in February last year, and then I didn't touch it for months. When I found it again in October, I decided to alter the cover and I have been filling the pages ever since. 
Here's a collage of 25 of the 30 completed pages, along with some shots of the journal itself. You can find the video at the bottom of the post. 


The pages in the video are shown in the order as they appear in the journal, and they are roughly (though not strictly) in chronological order. I can actually see how my techniques and style matured and evolved over the months. I'm particularly proud of the last page!


I'm linking this post to Carolyn Dube's Let's Play linky party. 
Why don't you share your play this week?

Let's Play!

Thursday, 3 March 2016

Let's Play: Make your own washi tapes from masking tape

Carolyn Dube's new Let's Play challenge this month is to use products from the hardware store as art supplies. One of my favourite products from the hardware store is masking tape. They come in different width and even colours. I normally just use them in my projects for texture and simply paint over them, but you can also decorate them to make your own washi tapes.

In order to make washi tapes, you'll have to tear different length of masking tape and adhere them to a piece of paper with a semi-porous surface. I find the waxed side of deli paper is perfect for this. The tapes stick well to the paper temporarily, but you can easily peel them off when needed.

Here are three techniques you can try.

1. Stamping with archival inks

This is a very simple process and perfect for using your background stamps, but it can also work with certain image stamps.  In my examples I used black archival ink for stamping. You can use pieces of these tapes for collage either on top of your artwork or layer over them. 


2. Gelli printing

You can also gelli print on pieces of masking tape. In order to do this, it's best if you temporarily adhere your tape to a sheet of deli paper (as above).  I used a mini gelli plate to stamp paint directly on my tapes (rather than putting them face down on the gelli plate). I applied some Golden Open medium to facilitate this process. I wrote about this technique in more detail in this post. You can even apply the paint over your stamped tapes for added texture. Once the paint is dry, you can just peel off the tapes and transfer them onto a clean sheet of deli paper for storage. Here are some of the tapes I made with this method. 


3. Staining with alcohol inks

You could use any ink for this method, but I like alcohol inks because they are waterproof when dry and have a special look about them. I just dripped a few drops of alcohol ink on my tapes and mingled them with some clear alcohol. Here are the results.


As a by-product, I got this really cool background pattern on my original deli paper. You can see how the inks seeped under the tapes but still preserved their outlines.


I hope you enjoyed my post and feel inspired to try some of these techniques. You can join Carolyn's link party too! Just click on the link below and it will take you there! You don't need to follow the challenge - you can link any of your inspiring projects! 

Let's Play!

Tuesday, 16 February 2016

Let's Play: Butterflies with micro beads

As I was going through my stash the other day, I bumped into a set of micro beads I purchased on eBay a while ago and never used them. I thought they would be perfect for Carolyn Dube's Let's Play link party, where the theme this month is neglected art supplies.

These beads are very very tiny and impossible to handle. A bit like glitter, really. In fact, you apply them pretty much the same way - just sprinkle them on a sticky surface and shake off the excess. Here's a photo of my set. They come in these cute little vials.


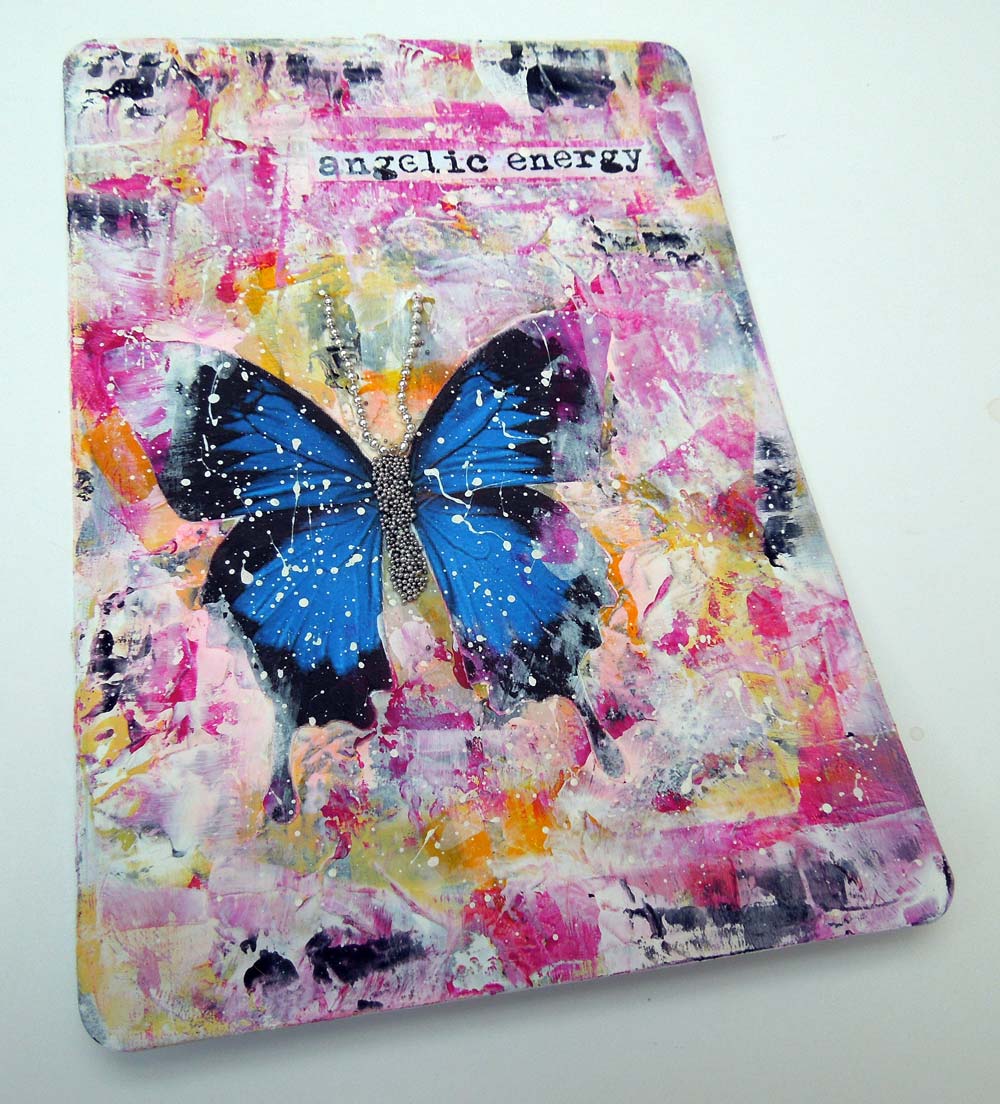
I used the silver ones on three of my altered angel cards to form the body of my butterflies. I used some ball chains for the antennae with similar beads. It would have been impossible to line up the micro beads manually! The background was made with leftover paint on deli paper and additional paint applied with a spatula. The butterflies were printed from the Internet. The words were inspired by the messages on the back of the cards. As a finishing touch, I splattered white ink all over the cards for a more distressed feel.


Hope you like my altered cards and feel inspired to create something with your neglected art supplies. If you do, don't forget to link up with Carolyn on her website below.


Thursday, 28 January 2016

Let's Play: Using left-over paint

I'm a bit late linking up with Carolyn Dube's Let's Play party this week, but better late than never! The January theme of using something that you would have thrown away continues. On this spread, I only used left-over paints from my pallette, which was a piece of deli paper. I first smudged the wet paint on my pages, then I collaged the deli pieces on top, once they were dry. I could never get this sort of random, distressed look on purpose otherwise!

Last week I worked on a page and I couldn't be bothered to find a piece of deli, so I just squirted my paints on a non-stick craft sheet. I really regretted doing this because all those yummy paints dried on my sheet and went to waste. I had no choice but scrub them away and wash them down the sink. This is not only bad for the environment, but it was also a lost opportunity for me to transfer all that colour into my artwork. So never again! I will always, always, always use a separate piece of paper for my palette from now on. Deli paper works best but it can be any other paper suitable for collaging.

Here's the page I created with my left-over paints. I simply stencilled some white flowers on the background and roughly outlined them. This was a very quick project and made me happy! My Play Journal is now almost full!


If you would like to join Carolyn's link party just  click the image below!

Let's Play!