Showing posts with label techniques. Show all posts

Wednesday, 23 May 2018

WOYWW #468: Happy 9th Anniversary!

The much anticipated 9th anniversary of WOYWW has finally arrived! Number 468 - isn't that unbelievable? That's 9 X 52 weeks of blog hopping hosted by Julia Dunnit on the Stamping Ground. I first joined in at #276 in September 2014 and have been a regular (on and off) ever since. Here's a look at my desk earlier this week:


I was working on some tags to send out with my ATCs for the anniversary swap and gelli printed some envelopes as well, while I was at it. I'll keep the final look under wraps until next week by which time they will have been received. It's been lots of fun working on a batch, which I don't normally do.

Now onto some of my experiments this week! I've recently bought some metal filigree embellishments from China and the idea struck me that I could turn them into stamps! I ran them through my Big Shot with a piece of foam, just like I did with the plastic packaging last week. It couldn't have been easier and I instantly made several new pattern stamps to use in my journals and other projects! You can use them with archival inks or acrylic paint as shown below.


Another thing I experimented with was string painting. I spotted a video that Shaz (Silverwolf) shared on Facebook and had a go. It's remarkably easy and I got good results straight away. I used acrylic ink in an A4 notebook. The best thing is that you get two pictures for the price of one - the mirror images of each other. The results are unpredictable and random, which is part of the appeal of this technique. 


I've been working on some other things as well, but they will be the subject of a separate blog post. For now, I'll just leave you with a couple of Oreo photos. He likes to be outside these days but luckily, never strays too far from the house.


I will be sending out my swaps tomorrow as they need some final touches. Hopefully they'll arrive by the end of the week as they're all UK addresses and I look forward to finding out who my PIF is later today. 

Happy 9th anniversary, everyone! Long live WOYWW and a big THANK YOU to Julia for making it all possible! 

Sunday, 13 May 2018

Journal page: Freedom

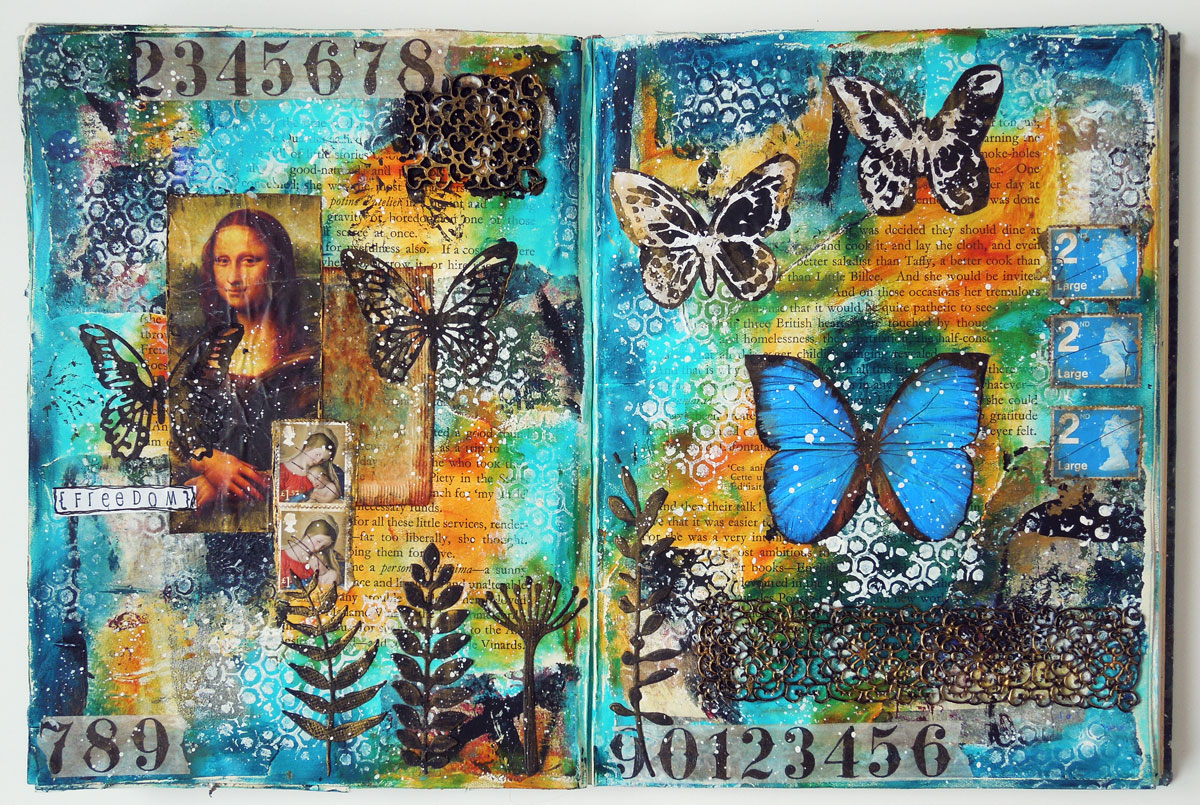
This is my first free weekend since January and I used my new-found freedom to make a journal page. I haven't made one in absolute ages and it felt so good to just let loose! I used my altered book and went berserk with collage and colours! This is the result of my abundant play:


Here's a list of some of the collage elements I used:
  • palette paper (torn into pieces)
  • printouts (left over from other projects and scrunched up for added texture)
  • used postage stamps (distressed)
  • used teabag
  • die-cuts (butterflies and plants)
  • washi tape (numbers)
I also included some lace pieces made with a silicone mould. These were just some experimental pieces lying on my desk that suited my project perfectly. One of them was made with gel medium, which I painted black and then accented with gold - the other is left-over black gesso with gold highlights. These moulds are marketed for cake decorating but they work just as well with acrylics to create amazing distressed textures for mixed media projects.


Another clever "hack" I discovered is a piece of plastic that I turned into a texture stamp. I was cooking dinner and was about to throw away the plastic chicken tray when the design on the bottom caught my eye. It looked like something Tim Holtz might have designed LOL! I cleaned it, cut it out and ran it through my Big Shot with a piece of foam and, voila, I got myself a fantastic new texture stamp!


Here's my page in more detail to show the individual elements:


I normally gesso my book pages before starting a new spread, but this time, I didn't. This resulted in some words from the underlying text being clearly visible. After taking these photos, I circled some of these words and thought about how they're relevant to my life. The words that jumped out at me were: gravity, gratitude and homelessness. Homelessness in particular made think about how I'm no longer Hungarian but I'll never be fully British either - culturally, I'm somewhere in-between the two and I'm not sure I will ever feel truly at home in either of my countries. This is not necessarily a bad thing, but I'll have to be aware that I will always appear a bit alien to people in both cultures. 

Thank you for coming along on my art journey this Sunday!
Enjoy the rest of your weekend! xx

Wednesday, 31 January 2018

WOYWW #452: Foam stamps made with stencils

I'm writing this blog post on Tuesday as I'll be at work tomorrow morning but I didn't want to miss this week's WOYWW. Here's the obligatory shot of my desk in all its messy glory earlier this week:


I was trying out some new paints and happened to have a cardboard envelope sitting on my desk, so I just grabbed that and smudged some paint on it in a random fashion. Then I remembered my home-made foam stamps, so I used one of those as well. I ended up with this upcycled envelope, which I'm sure will come in handy one day. 


These are the new paints I used. I bought them at Crafter's Companion who have an outlet near me. This shop together with The Range definitely make up for the lack of a Hobby Craft around here and satisfy my cravings for real-life shopping experience of arts & crafts products! 


In case you're wondering how I made the foam stamp, here's the set-up:


The photo shows a Big Shot, but I expect it would work just the same with all other similar die-cutting machines. I used the main platform with all tabs closed + cutting pad + kraft card + foam sheet + stencil + cutting pad.  The kraft card was added for extra resistance, but it could be anything else - just experiment to see what thickness works best. Run this sandwich through slowly a couple of times to make sure you get a good impression of the stencil pattern on the foam. It works remarkably well - much better than my previous experiment without a die-cutting/embossing machine which involved a hot iron with disastrous consequences!

Here are some more foam stamps I made this way. They work great on the gelli plate or you can roll some paint on them directly with a brayer to create some lovely, distressed textures..


Finally, I'd like to share something I received in the post yesterday all the way from the US from my very dear friend, Jackie. She sent me this beautiful tag wrapped in some lovely mulberry paper, which I will be using in collages. I'll even reuse the washi tape she sealed the envelope with! Thanks you so much, Jackie, for your kindness and thoughtfulness! It really made me happy and brightened my day!


Big thanks to everyone who have visited and commented - I promise to get back to every one of you some time in the next few days when time allows! Happy WOYWW! 

Wednesday, 18 October 2017

WOYWW #437: Playing with my inkjet printer

Another Wednesday has come around at the speed of light, so here I am for yet another WOYWW post to show you my work desk. However, today I have a different desk to share. This is my computer desk in the small study downstairs, which also doubles up as our classroom where I homeschool my son for the time being, hence the map on the wall. Hubby has his own study upstairs, so this is mostly mine to use!


One thing I've been wanting for ages was an inkjet printer, but we didn't have any space for it in the old house because our fat-ass laser printer took up all the space. There are a lot of things you can do with a cheapo inkjet that you can't do with a laser printer and I was dying to get one. This one cost me the grand total of £29 from Tesco's and I paid for it with vouchers, so it was technically free. It's the Epson XP-245, bottom of the range model, cheapest you can get, but it does the job brilliantly. 


It's small, relatively quick and works pretty well - so far, anyway. It's also wireless, so I don't have a load of cables to contend with. Just perfect for my purposes! Here are a few things I managed to print on with the help of some freezer paper used as a carrier sheet. (note: the tissue paper didn't come off the freezer paper, so I had to tape it to a sheet of ordinary printer paper instead.)  Artwork by Leonardo da Vinci, who continues to amaze me with his genius! Just imagine what he would have achieved in today's technologically advanced world!


I also experimented with printing directly on different surfaces: textured handmade Khadi paper (light grey), book paper and paper tinted with distress oxides. I was even able to print on top of acrylic gelli prints, which would be impossible with a laser jet as the heat would melt the polymers in the paint. 


I'm so happy with my cheapo little printer and will continue to experiment with different surfaces. It's been a long time since I felt the buzz of excitement doing experiments, which got me into blogging in the first place! I know it's a cliche, but the possibilities are truly endless! Next, I will try to print on different types of tape, which again would be impossible with a laser jet. 

I also took a shot of my regular work desk earlier in the week, so I might as well show it to you. It just happens to feature Oreo, who was lounging in my scrap box. I even found him sleeping in there one morning. He's been a lot happier since we let him roam the house at night. 


Just one last shot and I promise I'll let you go! I took this of the sunset last night - I love those pink and purple tones and it wasn't even photoshopped - it came out of the camera like this.


Thanks for making a pit stop on my blog - I'll be visiting later today as right now I have to get back to my homeschooling duties. Happy WOYWW! 

Wednesday, 28 June 2017

WOYWW #421: Erosion Bundle Results (yay!)

I seem to be out of sync with the WOYWW sequence, but I'll follow Julia's lead and call this week #422. (Nope, it is #421, after all!) Which is the number of weeks this marathon blog hop has been going on and even continues while Julia is Stateside doing all sorts of fun things.

What a difference a week makes, hey? Unbearably hot and stifling last week, cool and refreshing this week - I know which one I prefer! And I don't even mind the rain! Over the weekend, I decided to open my erosion bundles that I'd put out in the garden back in February, inspired by Evelyn Flint. I blogged about them here and here. My bundles looked like this before I opened them:


Having learned my lesson from the sneak peek, I opened them outside expecting all sorts of residents to emerge. Sure enough, there were some spiders, earwigs and other tenants that I couldn't even identify crawling around. They have all been evacuated unharmed and are now happily living somewhere else in the garden. There was a lot of ooohing and aaahing on my part when I opened the packets, though neither my son nor my husband seemed to understand my fascination with the weathered textures and colours. My son thought they were "skanky" - I think, they're delectable! Each to their own - see, what you think!  


I'm totally in love with this process and will try it again soon. I can use these elements in collages and on journal pages or just admire them as they are. 

Thanks for visiting today. I lost my internet connection last week, just as I was doing my rounds, so it took me a few days to get back to everyone. If I accidentally missed you, please give me a shout! 

Wednesday, 8 March 2017

WOYWW #405: Faux leather and stamp storage system

I wasn't sure if I was going to take part in this week's WOYWW as there's absolutely nothing on my desk at the moment.  With the house on the market, we have to keep it tidy and clean for viewings so I haven't been able to do much lately. Plus I hid my stuff from view all over the place and I can't remember where I put things!  I fell behind with my classes as well. (sad face)

Then I remembered that I had made a piece of faux leather last week right after visiting Annie Claxton's blog. You know that feeling when you have to try something immediately, just to see how it works? It's almost like a burning desire - I just had to try this! Luckily, I had all the ingredients available: TPR (toilet paper roll), moisturizing cream (in lieu of liquid glycerine) and a range of distress ink pads. See the exact instructions on Annie's post here. This is what mine looks like, front and back without any embossing:


It got torn in the process, but it doesn't bother me, What a great technique and it looks remarkably like real leather! 

Instead of my desk today, I'll show you my state-of-the-art, patented stamp storage system (S.S.S.) -tada!


Yep, it's a plastic box where I dump all my stamps. Some of them are still in their original packaging, others just hang loose. And I never clean them (unless I use them with acrylic paints, of course). Most of them are background/texture stamps so they don't need to be pristine and I usually just grab one at random. So that's my dirty little secret out in the open.

Just to make this ad-hoc post complete, here's a video I shot of Oreo drinking out of the kitchen tap. We left it dripping on purpose, but when it's not dripping, we saw him suck it - seriously! Now I have to disinfect the tap every day. And for the record, he has TWO bowls of fresh drinking water available at all times! 


Thanks for visiting today. 
Happy #405!