Wednesday, 28 September 2016

WOYWW #382: Recycling your own art on tags

Happy Wednesday Peeps! The weather is definitely turning autumnal. I love this time of year, don't you? Christmas is already on the horizon, but we still have our memories of the summer fresh in our minds. Oops, I'm not here to get sentimental, but to share my desk on the Stamping Ground for today's WOYWW.  Here it is, looking like a battleground yesterday afternoon.


I was working on this week's LifeBook bonus lesson, creating "page wardens" as introduced by the lovely and super creative Roxanne Coble. These are basically tags used as bookmarks inside your journals to ward off self-doubt and your inner critic. Boy, do I need those! I machine stitched my own artwork to these tags on a watercolour background decorated with some washi tapes and doodling. They're all different shapes and sizes with a matching piece of sari ribbon. Here's my collection so far:


I've got a few more photos to share today. I took a snapshot of the birthday cake I made for my son last week. It's long gone now - we decorated it with M&Ms. We had to throw away a big chunk of it because we caught Oreo licking it (which makes me think, what else did he lick while we were not looking, ewww)!


In the next photo, Oreo is surveying the garden after the rain. I find it very atmospheric!


Finally, I was able to get him to settle on his new cat tree, though he still doesn't use it on his own free will, preferring to lounge on the dishrack instead! You can see both scenarios illustrated below.


Thanks so much for stopping by.
Wishing you all a creative week!

Sunday, 25 September 2016

LifeBook Week 38/39: Soulhouse & Guardian Angel

Today I'm sharing two new pages from my LifeBook.

The first one was inspired by last week's lesson by Melody Ross, co-founder of Brave Girls Club. The lesson was titled Beautiful Boundaries, and although I deviated from the concept a little, I've found the 'soulhouse' idea very inspirational. The words in the windows of my soulhouse represent the qualities I value in people. People who are opposite to these qualities are not allowed in my soulhouse.

This is actually my second attempt at this lesson. The first one turned into a bit of a rant at the type of people I don't want to be around and I didn't want to be so negative. My second try focuses on the positive qualities and depicts my happy place. I textured the layout with a stencil and some gesso and painted over it when it was dry. The entire picture is paper pieced, so it was quite easy. I used patterned papers, dictionary papers and gelli prints. I like its simplicity!


The second page I want to share is this week's lesson by Ivy Newport. It started out as a self-portrait painting over my own face but I got into a pickle and had to gesso over the face and start again. I kept working on it, until I produced something passable. Here's how it turned out in the end. It's not great but it's good enough for my LifeBook. As long as I don't cringe every time I look at it, I consider it acceptable! 


Thanks so much for visiting! 
I hope you're all having a wonderful and creative weekend!

Wednesday, 21 September 2016

WOYWW #381: Birthday card from recycled cardboard

Happy 381st WOYWW! Today happens to be my son's 12th birthday. Yesterday he asked me if I was making him a personalized card. I realized that I'd totally forgotten all about it. Eeks, how is that even possible? Luckily, I had enough time yesterday to create one. I was a little stressed because I had no idea what I could do to surpass, or at least match, the success of his 10th and 11th birthday cards, but I just let the process carry me. I hope he likes it - he'll get it, along with his present, when he gets home from school.

I moved my workstation to the kitchen counter expecting this to get very messy and I was right! This is what it looked like at its initial stages. Cardboard gessoed on both sides along with the large number shapes I cut from the leftover cardboard. It's one of those foldout mailers you get from Amazon when you order books. I had to alter the photo and make it look more artsy because my kitchen counter looked a bit naff.


I used heavyweight gesso to stencil some textures on the cardboard flaps and the cut-out numbers. It took absolute ages to dry, even with the help of a hairdryer. I dry-brushed some Prussian Blue acrylics all over the stencilled textures, followed by some Sunset Gold by Lumiere. I went back with the Prussian Blue in places to tone down the gold a bit and finished off with some rust paint around the edges. I did the same on the back, without stencilling. The paint picked up the subtle texture in the cardboard quite nicely. I simply stuck some photos on the inside with a birthday message. I'm pretty happy with the results!


We also designated September 21st as Oreo's birthday. We don't know exactly when he was born, but it must have been around this time because he was eight or nine weeks old when we got him in November last year. We gave him his present yesterday, as we couldn't wait! It's a cat tree! Here he is modelling it, though I must say he hasn't been on it since, preferring to climb on top of the kitchen cupboards instead. That was 30 pounds well spent then, LOL! We like it, even if he doesn't!


Thanks for visiting folks! 
I'm off to bake a cake now but will be back
to do my rounds while it's in the oven! 

Sunday, 18 September 2016

Wanderlust Week #38: Altered brown bag envelope

It's been ages since I posted a Wanderlust project. Even though I've watched all the videos, I haven't always had time to complete the assignments. That's ok! I'm enjoying the freedom of taking online classes without the obligation to do each lesson every week. I still learn a lot just by watching the videos.

This week, however, I absolutely had to try Roben-Marie's brilliant idea of turning a brown paper bag into a colourful, funky envelope. Interestingly, just an hour before receiving the link to the video (without being aware of the course schedule) I was looking at one of those brown bags, thinking 'hmm, what can I do with this?' How is that for serendipity?

I'm not at liberty to share the entire step-by step process, but perhaps I'm allowed to post a few in-between shots to demonstrate how my layers built up.

collage papers

bits from my own artwork, plus gesso

black paint and white stencilling added for contrast
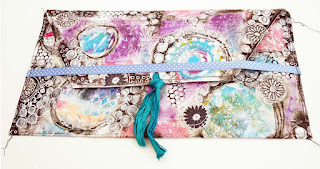
Here's the finished envelope, complete with stitching, doodling, stampin and some more colours added. I think I may have overdone it and lost most of my background, but hey, I had so much fun in the process!


After all these layers of collage and paint, the brown paper turned quite sturdy and it would be suitable to send in the mail as mail art. There could be other uses as well.  I think I will use mine to keep my leftover collage papers in it. I gessoed the inside so it looks neat. 

Thanks for visiting today! Wishing you a creative Sunday!

Wednesday, 14 September 2016

WOYWW #380: Altered Tarot Cards

At this time yesterday, I still had no idea what I was going to post for WOYWW, as I found myself in-between projects yet again. Then I received a newsletter from Roben-Marie Smith with a free tutorial to create a tri-fold book and I felt an irresistible urge to try it! This is what my desk looked like at the initial stages of the process. I had just covered some tarot cards with dictionary paper, waiting for the gel medium to dry. You can see the original cards in the background. They are slightly larger than 4" X 6".


Next, I added some gesso and colours, which you can see in this photo:


After adding some raw umber, collage pieces, washi tape and white stencilling, my folded booklet looked something like this:


At the next stages, I stitched around the edges and added some photos to create a mini-scrapbook. My theme was inspired by our visit to Portsmouth in August, where we saw the remains of the Mary Rose. This is what my finished book looks like, complete with white doodles and splatters.


Of course, Oreo had to muscle in too and photobomb my shoot!


Thanks for visiting! I'll be making my rounds shortly!

See if you can guess what the numbers 1545, 437 and 500 refer to!